Azure AD: Groups memberships in SAML 2.0 assertions to SAP Analytics Cloud
Someone asked how to add group membership to the SAML 2.0 assertion from Azure AD to an application such as SAP Analytics Cloud. This would allow seamless single sign-on to SAP Analytics Cloud (SAC). This post documents the steps to sending group membership in the SAML 2.0 tokens from Azure AD to SAP Analytics Cloud (SAC).
Background:
You can pass group membership either as Application Roles or Security Group from Azure AD. Either gets translated into permissions during SAC’s authorization. See here to learn the Pros and Cons of Application Roles and Security Groups.
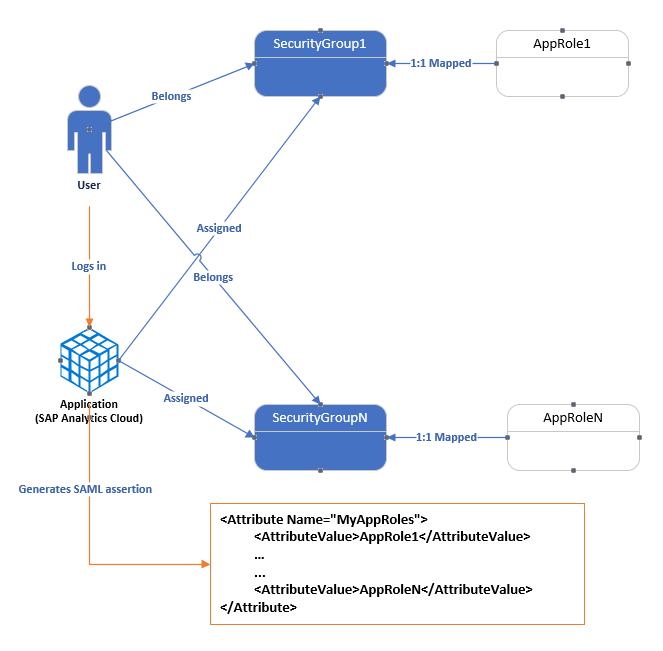
I chose to send group membership as Application Roles because I need to filter groups. In this case, Groups were sourced from an on-prem AD. Security Groups cannot yet be filtered. Security Groups are restricted. Instead it is much simpler and cleaner to use App Roles. Each user is already assigned to one or more Security Groups (sourced from on-prem). Each Security Group gets assigned to an App Role (in step 4 below). When a user logs in to SAC, Azure AD will emit all the App Roles that the user is indirectly assigned to via Security Groups. Neat! This capability requires Azure AD Premium. You can learn about this capability here
Note: If groups are to be synched from an on-prem AD, AD Connect should be version 1.1.649.0 & above.
I do not have access to SAC. I’m going to use a WS-Federation client application to mimic the SAC client interaction with Azure AD. See optional step 6 for how to setup and configure SAC client application.
Here are the steps:
- Create the application in Azure AD
- Configure the SAP Analytics Cloud Application in Azure AD
- Create Roles for the Application in Azure AD
- Assign Security Groups & App Roles to the Application
- Customize the claims issued in the SAML tokens
- Optional: Configure a sample client for testing
- Test and verify
1. Create the application in Azure AD
The application object in Azure AD is a representation of SAP Analytics Cloud. This object is going to control authentication and issue SAML tokens. Azure AD provides a few options to register the application:
- Register via Portal > Enterprise Apps > Non-Gallery Application
- Register via Portal > Enterprise Apps > Gallery Application
- Register via Portal > App Registrations
I choose the first option - Non-Gallery App because it is easier to learn when you can completely customize the SAML token when compared to SAP’s Gallery Application. Also, you can use the portal to customize the SAML tokens for (Non-Gallery) Enterprise Apps compared to App Registration Apps.
Here is how to register the SAP Analytics Cloud in Azure AD:
Go to: Portal > Azure Active Directory > Enterprise Applications > New application
Select Non-Gallery Application from the top right
Give it a name (say SAP Analytics Cloud) and click Add
Now you have created a Service Principal and an Application Object. The Service Principal is accessible through: Portal > Enterprise Application. The Application Object is accessible through: Portal > App Registration. Be sure to not use the Application Object created under Portal > App Registration(Preview) because SAML 2.0 and WS-Federation protocols are not yet supported under the V2.0 endpoint (will be available soon). See here to learn more.
2. Configure the SAP Analytics Cloud Application in Azure AD
Now that you have an application object to represent SAP Analytics Cloud in Azure AD, lets configure it:
- Set the Logout URL
- Assign users to the application
- Provide the Application permissions to the Azure AD
2.1 Set the logout URL
Set the client application’s logout URL at: Portal > App Registration > Settings > Logout URL
You would set it to your SAC instance’s logout URL. This demo, sets it to https://localhost:44320 in support of optional step 6
2.2 Assign users to the application
An administrator can control which users or groups have access to the application. For this demo, I set User Assignment Required to No.
Go to: Portal > Enterprise Applications > Properties >User Assignment required set to No.

2.3 Provide the Application permissions to the Azure AD
Azure AD supports two kinds of permissions:
- Delegated permissions: Used by apps that have a signed-in user present
- Application permissions: Used by apps that run without a signed-in user present
We will configure an administrator consented delegate permission to the SAC app.
Go to: Portal > App Registration > Settings > Required permissions.
Click Add.
Select “Windows Azure Active Directory”
Provide Delegated Permission to the App for “Sign in and read user profile”
3. Create Roles for the Application in Azure AD
In this step, we define the application roles in Azure AD for the SAC application.
Azure AD provides two ways to create roles:
Chose the manifest approach because its easier to explain on the portal.
Let us create a sample AppRole1 and AppRoleN roles for this application:
"appRoles": [
  {
    "allowedMemberTypes": [
      "User",
      "Application"
    ],
    "description": "Dummy App Role1",
    "displayName": "AppRole1",
    "id": "1b4f816e-5eaf-48b9-8613-7923830595ad",
    "isEnabled": true,
    "value": "AppRole1"
  },
  {
    "allowedMemberTypes": [
      "User",
      "Application"
    ],
    "description": "Dummy App RoleN",
    "displayName": "AppRoleN",
    "id": "c20e145e-5459-4a6c-a074-b942bbd4cfe1",
    "isEnabled": true,
    "value": "AppRoleN"
  }
]
Notice that the “allowedMemberTypes” targets Applications and Users.
To define the role, go to: Portal > App Registrations
Select All Apps from the drop down and pick the app you registered earlier
Click Manifest and update the manifest with the App roles you want to create:
Also read the documentation on how to create App Roles
4. Assign Security Groups & App Roles to the Application
This is where we assign on-prem sourced Security Groups to the App Roles created for the Application. It allows us to filter and send only required Security Group names as App roles to SAC.
In this demo, I have two pre-existing Security Groups: SecurityGroup1 and SecurityGroup2 that are sourced from on-prem. We are going to assign these SecurityGroups to the Application and give them an App Role.
Go to: Portal > Enterprise Application Select the application Object Under Users and Groups, assign security groups to application roles Set the Roles for those assignments to be App Roles. Note, there is a 1:1 mapping between Security Groups and Application Roles

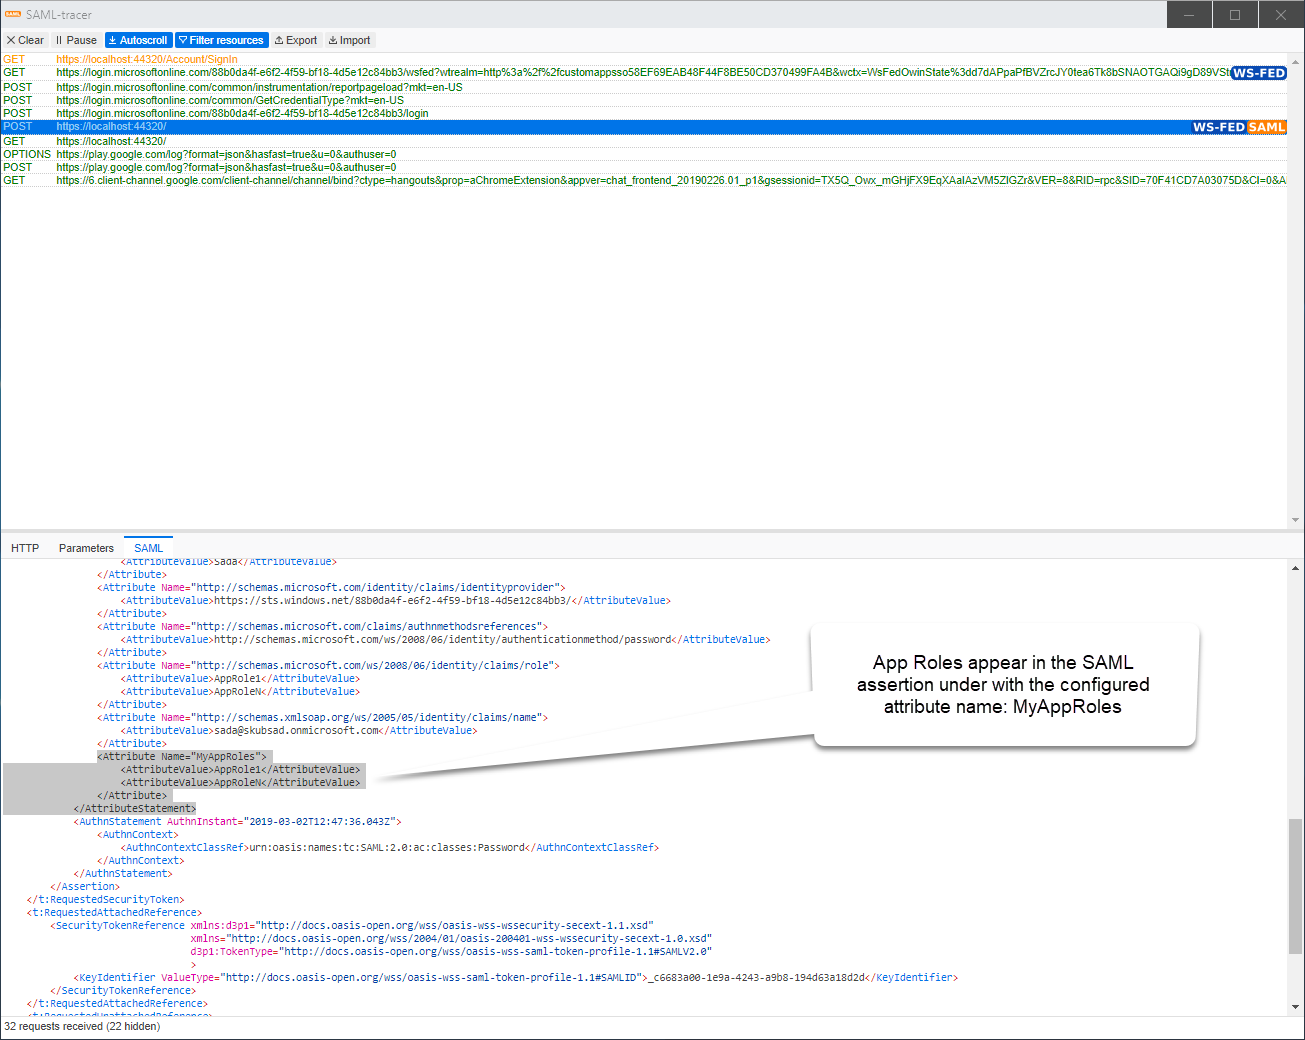
5. Customize the claim name issued in the SAML tokens
SAP Analytic Cloud client looks for the name at the end of the URL formatted claim name, not the whole URL – so set the claim name to a friendly name. This example sets it to Name=“MyAppRoles”.
This changes the claim name in the SAML assertion from:
    <Attribute Name="http://schemas.microsoft.com/ws/2008/06/identity/claims/role">
        <AttributeValue>AppRole1</AttributeValue>
        <AttributeValue>AppRoleN</AttributeValue>
    </Attribute>
to:
    <Attribute Name="MyAppRoles">
        <AttributeValue>AppRole1</AttributeValue>
        <AttributeValue>AppRoleN</AttributeValue>
    </Attribute>
You can read more about it in the Azure documentation here
6. Optionally Configure a sample client for testing
Steps:
- Get the App ID URI from Azure AD
- Clone the sample repo
- Configure the sample application
6.1 Get the application’s App ID URI
The App ID URI is a uniquely identifier to the application in Azure AD.
Fetch the App ID URI from: Portal > App Registration > Settings > Properties > App ID URI
6.2 Clone the repo
Clone the WS-Federation client application repo.
6.3 Configure web.config
Configure the following in the application’s Web.config file:
-
ida:Wtrealm key set to the App ID URI. App ID URI is auto generated in Step 1 when you register the application in Azure AD. The App ID URI is a URI that uniquely identifies the application. Find the App ID URI under: Portal > App Registration > Settings > Properties > App ID URI and set it to the ida:Wtrealm key in web.config
-
ida:AADInstance key is set to the AAD instance. Its value is: value=”https://login.microsoftonline.com/
". You will find the AAD Instance GUID under: Portal > Azure Active Directory > Properties > Directory ID
6.3 Configure the token signature in startup.auth.cs
Sign in will fail if the token signature can’t be verified. That is because Enterprise App config creates an App specific signing key, but the App is picking up AAD’s global cert from the tenant metadata by default.
To solve for this look for this line in startup.auth.cs and add the ?appid=
private static string metadata = string.Format("{0}/{1}/federationmetadata/2007-06/federationmetadata.xml?appid=<AppID>", aadInstance, tenant);
7. Test and verify!
Use a tool like SAML-tracer browser plugin to incept and verify that the SAML assertions are getting correctly generated.
If you need to debug, here is some great help